User Guide
- Opening a Media File
- Creating Markers
- Editing a Marker
- Setting Timestamps
- Changing Button Liveries
- Adding Notes
- Exporting Clips
Key Concepts
MARKER
Markers are MovieML’s basic building blocks. New markers are created with a single timestamp field. Each marker contains a note, and can be colour-coded. Clicking on the marker button moves the media player’s seekbar to the marker’s timestamp. Single markers can be combined with split markers for export to an MMLMovie file, but cannot be included in an MMLSchema (covered later).
SPLIT MARKER
A single marker can be split into a pair using the ‘Split’ function in the ‘Edit’ screen. Split markers can be used to bracket a timecourse segment, and be exported as part of an MMLSchema marker set.
SAVING FILES
Session data, comprising new and/or imported marker data, is held in memory and not saved until the ‘Save to File’ button is clicked. MovieML uses the browser’s download functionality to mimic the ‘Save As’ functionality of a desktop app, and files are therefore saved to the browser’s default download destination. Browser settings can be modified to specify different save destinations if required.
MMLMOVIE FILE
All session markers, single and split, and including timestamps, colour coding, and notes, are exported as an XML-formatted MMLMovie file when the ‘Save to File’ button is clicked. This file is created as a media file-specific document, with a header containing automatically-generated media file metadata and a body containing the marker information. A warning will be generated if this MMLMovie file is subsequently loaded into a session using a different media file, but its markers can nonetheless be merged with that session if required. If details are merged in this way, the header metadata from the incoming MMLMovie file are discarded in favour of those generated by the currently active media file.
MMLSCHEMA FILE
The ‘Export Schema’ button saves an XML-formatted MMLSchema file to disk. This file contains a header with information about the schema, and a list of the named split markers ordered by ascending start times. Singleton markers are discarded, as are media file metadata, timestamps, notes and button liveries, as the purpose of the schema is to present a generic marker set for application across different media files. When loaded into a session using the ‘Load XML’ button, schema markers are merged with the existing session data as a new marker set with empty notes, timestamps, and button livery fields which can be edited and exported to a session-specific MMLMovie file.
Using MovieML
The examples used in this section refer to video files, but can be applied to any timecourse media file recognised by the browser’s HTML5 media player.
Opening a Media File

*PLEASE NOTE
If you have installed the video clipping patch, please copy your source file into C:\MovieML\media\ and load it into MovieML from there.
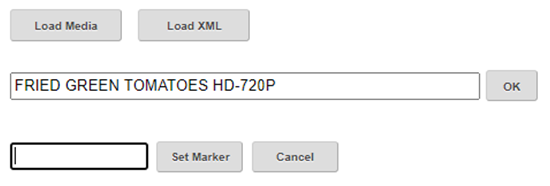
When a new video file has been loaded using the ‘Load Media’ button, a video title is automatically generated from the filename. Change the name and click ‘OK’, or skip this step if an MMLMovie file is about to be loaded which already contains a name for this video.
Creating Markers
Use the ‘Load XML’ button to load either an MMLMovie or an MMLSchema file, or click the ‘New Marker’ button to create a new marker.
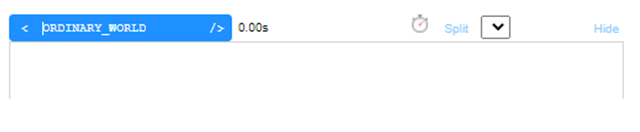
Marker names must be unique to the session, unspaced, alphanumeric, and contain no more than 22 characters. The underscore ‘_’ character can be used instead of a space. Type in a marker name and click ‘Set Marker’. A new singleton marker is created in the default blue livery. The marker timestamp will be set automatically to the media player’s current seekbar time.

New markers can also be created using the </> icon on the media player controls.
Editing a Marker
Clicking on the blue ‘Edit’ link to the right of the marker button opens the marker’s edit controls.
Edit the marker name in the button text box.
Setting Timestamps
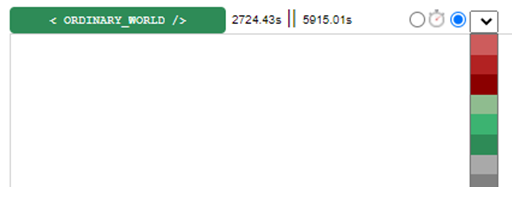
To change the timestamp, move the media player seek bar to the desired time and click on the stopwatch icon. Split the marker and add an end timestamp by clicking on the blue ‘Split’ link (shown in the previous illustration) which produces:

The end timestamp can be set by moving the media player seekbar to the desired end time, selecting the radio button to the right of the stopwatch icon, and then clicking on the stopwatch icon. The start time can be reset in the same way using the left-hand radio button.
Changing Button Liveries
The button livery can be changed using the dropdown to the right of the right-hand radio button:
Adding Notes
Annotations can be added in the textarea (up to 1000 characters):

To add the changes to the session data, click the ‘SET’ button. (This adds your changes to the session data only, and does not save them to disk.)
Marker notes can be viewed by clicking on the blue ‘Expand’ link.
Additional marker sets can be imported using the ‘Load XML’ button.
Exporting Clips
Split markers can be exported as video clips using the ‘Clip’ link if the video clip patch has been installed (available from http://MovieML.org/downloads). The source video must be copied into the C:\MovieML\media\ directory created by the patch installer before the MovieML session is started and loaded using the ‘Load ‘Media’ button. The 'Clip' link will appear once an end time has been set for the marker which is greater than the start time. Clips are extracted to C:\MovieML\media\clips\.

CAUTION
Session data is held in memory, and not saved until the ‘Save to File’ button is clicked.
MovieML App